
Prometheus 2.28 has been released this week. Among all the improvements presented in the release, the ability to read Consul tokens from a file was added.
TL;DR
In order to use the Consul secret saved in a file, you have to configure your Prometheus instance as follows:
scrape_configs:
- job_name: consul-services
 consul_sd_configs:
 - server: localhost:8500
   authorization:
     credentials_file: consul_token
In the above example, the name of the file is consul_token.
Context
Prometheus and Consul have been working together for a very long time. Many Consul users use the service discovery capabilities of Prometheus to efficiently monitor their services.
Whether it is pure Consul implementations or Consul with Nomad, Prometheus is an efficient way to monitor your dynamic environments. As soon as your services will be added, scaled, moved, the monitoring will react to those changes and point at the correct target.
Moving one step further, Prometheus 2.28 has the ability to load Consul tokens from a file. This has been achieved by integrating the long-polling options to the Prometheus common HTTP client, which de-facto enables reading secrets from file.
Another property of the HTTP client library, is that secrets from file are read directly when changed. This means that Prometheus picks up new tokens as soon as they are written on disk. Rotating them is as easy as changing the content of the file.
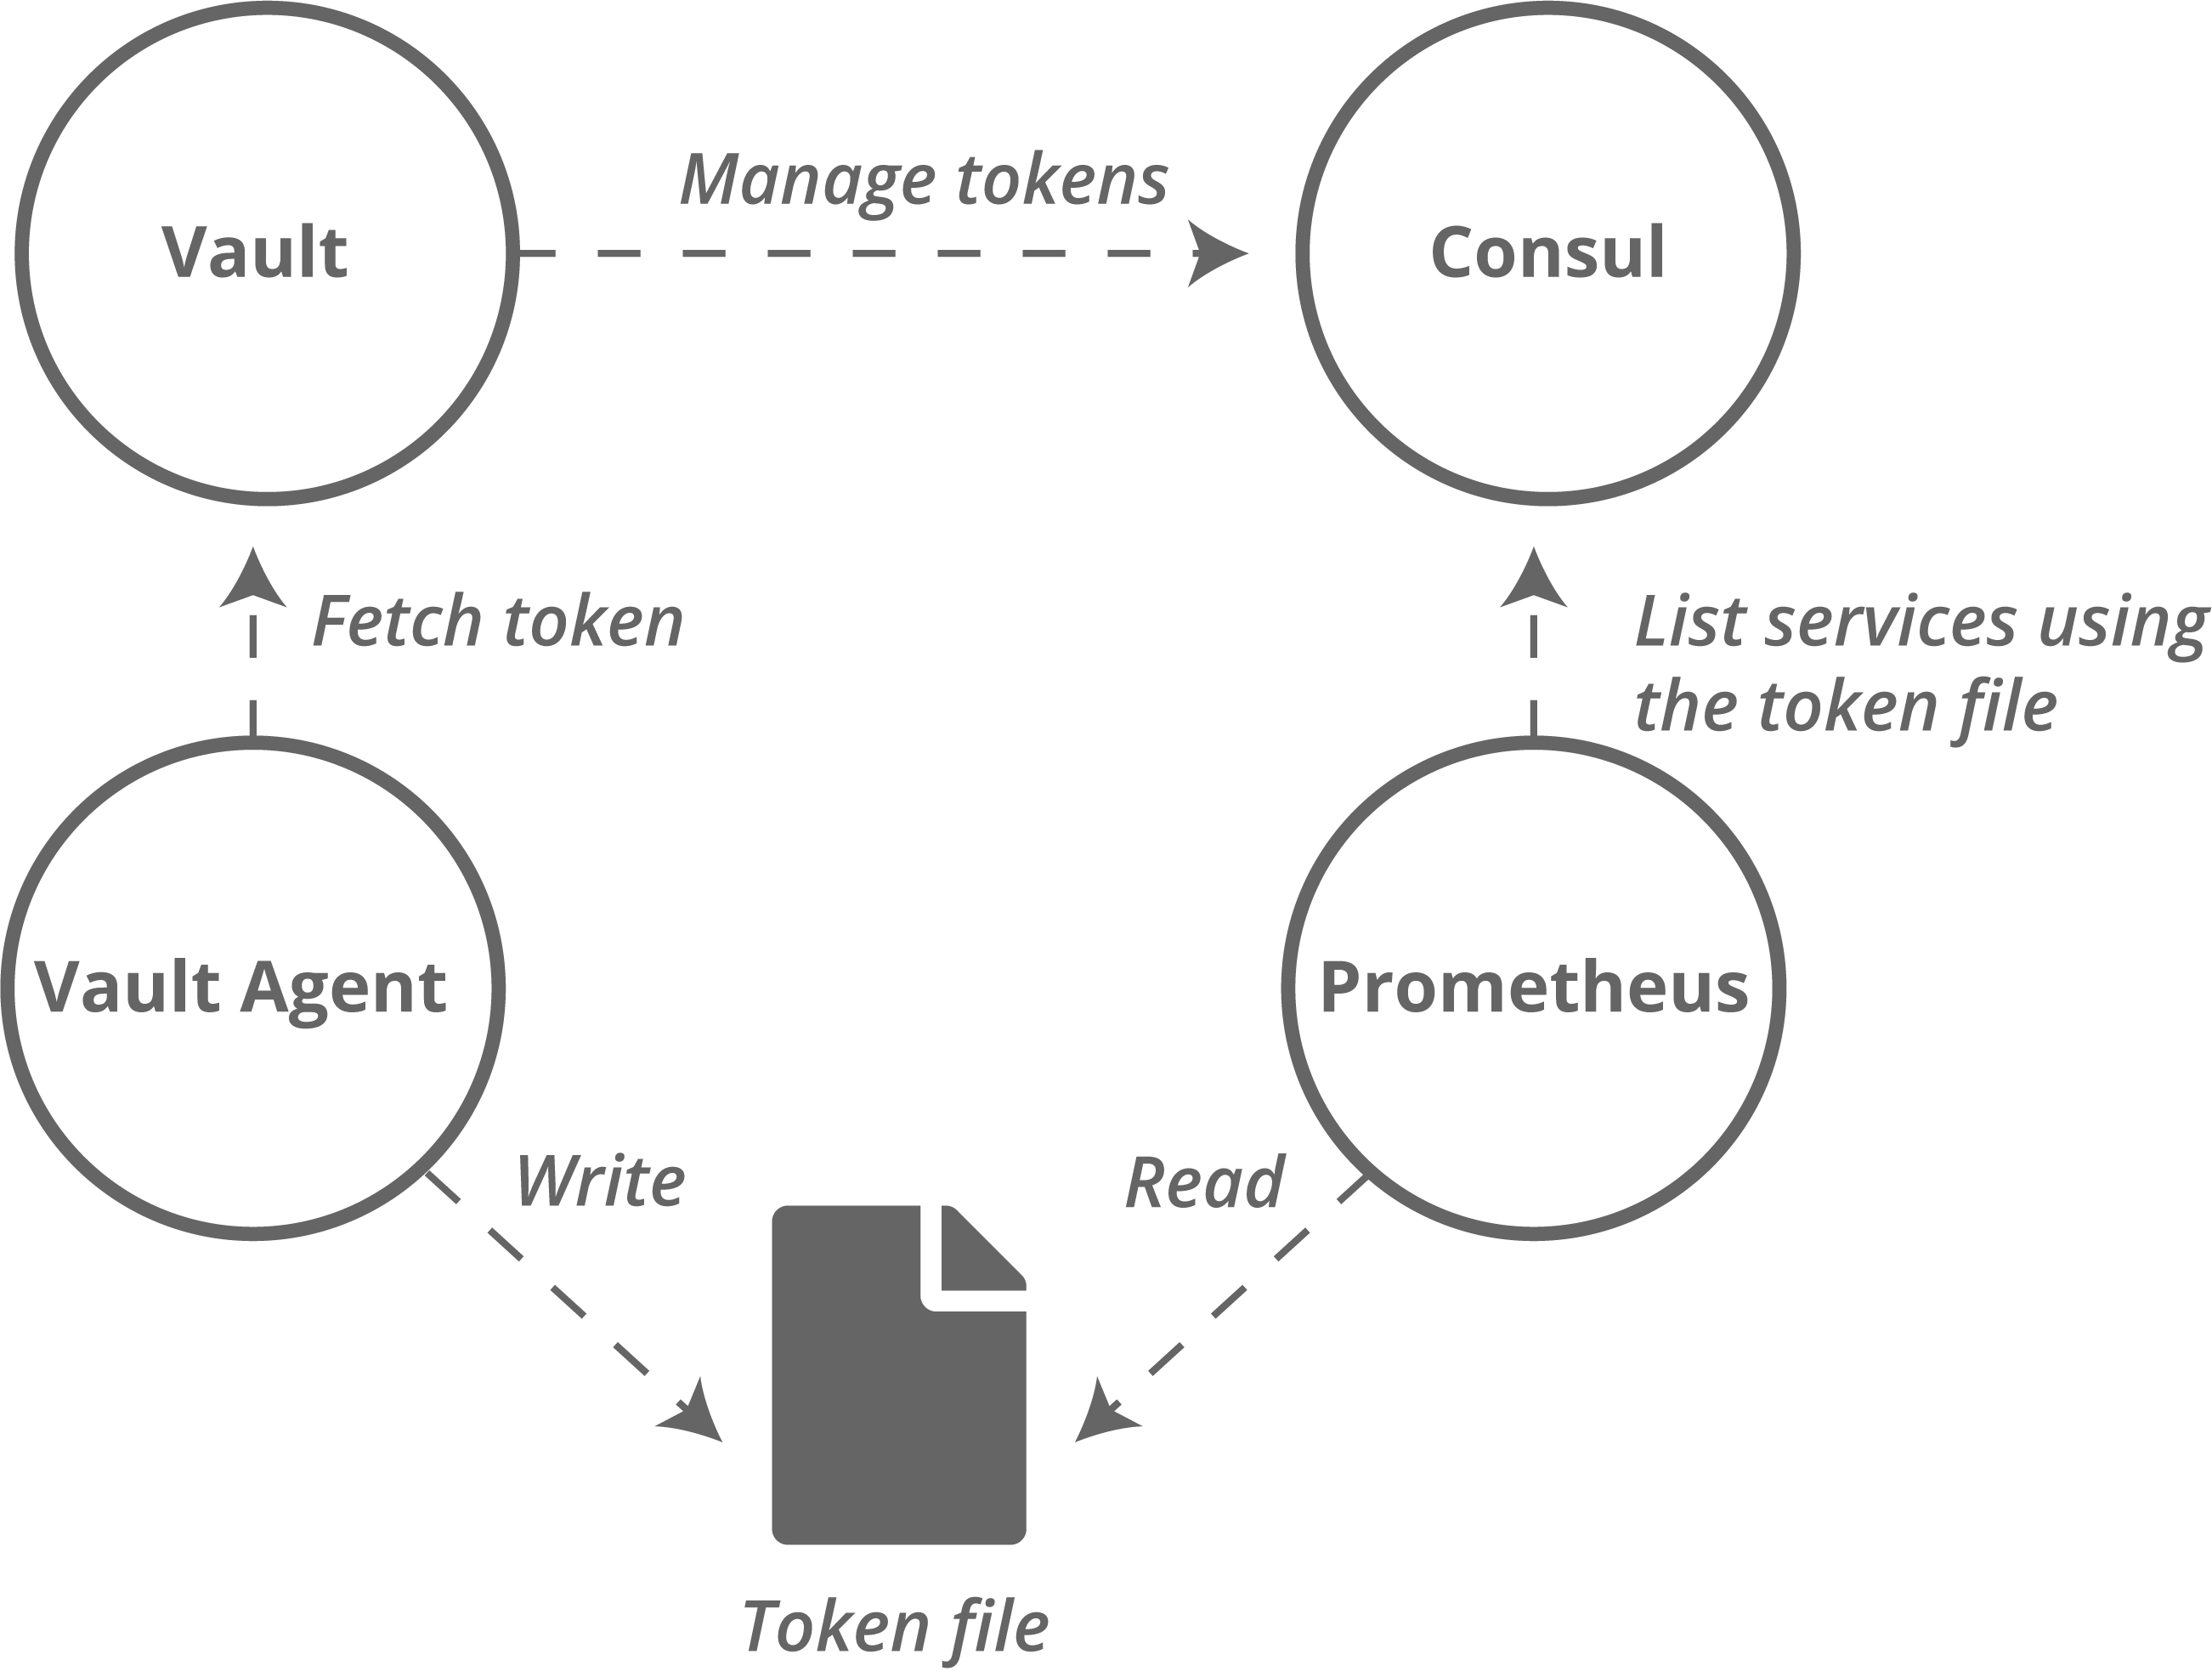
This the moment where Vault enters the scene. Vault can provide temporary tokens to connect to Consul. By using the Vault Agent, it is possible to use short lived, renewable tokens to connect Prometheus and Consul.
Note that even if you are not using Vault, you can also use tokens from files with Kubernetes secrets.
This improvement was contributed by Austin Cawley-Edwards.
Tutorial
This tutorial will demonstrate how to combine Prometheus, Consul and Vault. However, it will not explain the basics of each of these tools, instead it will focus on the connection between these.
In our solution, the Vault Agent connects to Vault, to generate a Consul token. That token is then written to a file and used by Prometheus Service Discovery.
Do not use the configuration used in this tutorial in production as Consul and Vault are run in development mode which is insecure. In order to make this tutorial straight-forward, this trade-off had to be made.
Setting up the tools
For this tutorial, we will use 3 tools:
- Prometheus 2.28.0
- Consul 1.9.6
- Vault 1.7.3
Vault
Download and start Vault. We use the development mode of Vault for a quick start.
$ wget https://releases.hashicorp.com/vault/1.7.3/vault_1.7.3_linux_amd64.zip
$ unzip vault_1.7.3_linux_amd64.zip
$ ./vault server -dev
WARNING! dev mode is enabled! In this mode, Vault runs entirely in-memory
and starts unsealed with a single unseal key. The root token is already
authenticated to the CLI, so you can immediately begin using Vault.

You may need to set the following environment variable:

   $ export VAULT_ADDR='http://127.0.0.1:8200'

The unseal key and root token are displayed below in case you want to
seal/unseal the Vault or re-authenticate.

Unseal Key: 7MXz0rHvcMwg6rOW+Pn3F1eG+z0oam3eg0KBWZX9q2s=
Root Token: s.XdJxCPFX3MmSZ4CXpioYcXB6

Development mode should NOT be used in production installations!
After Vault has started, it will print a key and a token. These are not necessary for this tutorial but can be used to access the Vault UI.
Consul
Consul requires an extra configuration file to enable ACL’s, so we will create a minimal one, called consul-config.hcl:
acl = {
 enabled = true
 default_policy = "deny"
}
This minimal configuration will not preserve tokens after restart.
Then, we can download and launch Consul
$ wget https://releases.hashicorp.com/consul/1.9.6/consul_1.9.6_linux_amd64.zip
$ unzip consul_1.9.6_linux_amd64.zip
$ ./consul agent -dev -config-file consul-config.hcl
Like for Vault, we are using the development mode (-dev).
Prometheus
At this stage, we will not launch Prometheus yet, but we will already download it. We need Prometheus version 2.28.0 at least.
$ wget https://github.com/prometheus/prometheus/releases/download/v2.28.0/prometheus-2.28.0.linux-amd64.tar.gz
$ tar xvf prometheus-2.28.0.linux-amd64.tar.gz
Setting up Consul ACL
We need to bootstrap the Consul ACL’s, then setup a token for Vault. Note that Consul must be running.
The following command will generate a Global Management Token in Consul, which is a privileged account.
$ ./consul acl bootstrap
AccessorID:       8de5eb42-75ff-c8c9-14a0-4b3cd22bd7e8
SecretID:         7f749534-db85-0df5-fb5c-27df2b082f6b
Description:      Bootstrap Token (Global Management)
Local:            false
Create Time:      2021-06-22 14:56:50.300310161 +0200 CEST
Policies:
  00000000-0000-0000-0000-000000000001 - global-management
The token, in this case, is the SecretID.
Vault needs a token too. Vault will manage the lifecycle of the tokens used by Prometheus to connect to Consul. Instead of reusing the global management account we have used, let’s create a new one. Note that we set CONSUL_HTTP_TOKEN to the value of the global bootstrap token created before.
$ CONSUL_HTTP_TOKEN=7f749534-db85-0df5-fb5c-27df2b082f6b consul acl token create -policy-name=global-management -description "Token used by Vault"
AccessorID:       addc3e7e-0e98-4c91-7d18-a098f03403ef
SecretID:         98fb5784-949b-bb5f-94a6-4fc389dd4a29
Description:      Token used by Vault
Local:            false
Create Time:      2021-06-22 14:58:13.597468342 +0200 CEST
Policies:
  00000000-0000-0000-0000-000000000001 - global-management
Now that we have a token that can be used to create new tokens, let’s create a policy that we can attach to those new tokens. Prometheus requires read-only access, so let us create such an ACL. To do so, create a readonly-rules.hcl file:
service_prefix "" {
   policy = "read"
}

agent_prefix "" {
   policy="read"
}

node_prefix "" {
 policy = "read"
}
We can upload that file into a policy in Consul:
CONSUL_HTTP_TOKEN=7f749534-db85-0df5-fb5c-27df2b082f6b ./consul acl policy create -name readonly -rules @readonly-rules.hcl
We have created a policy called “readonly”, which can be assigned to tokens. Those tokens will have access to a lot of information from Consul, including services. Note that the Consul K/V store will not be available to those tokens.
Setting up the Consul backend in Vault
Let’s teach Vault how to create tokens in Consul. We will setup a Consul secret engine, which we will use to emit short-lived, renewable tokens.
In the following snippet, we use the token that we made specifically for Vault in Consul.
$ export VAULT_ADDR='http://127.0.0.1:8200'
$ ./vault secrets enable consul
$ ./vault write consul/config/access address=127.0.0.1:8500 token=98fb5784-949b-bb5f-94a6-4fc389dd4a29
We will now create a role “Prometheus” which will generate tokens with the policy “readonly”, also created in Consul in the previous step. We set a TTL (Time To Live) of 30 minutes.
$ ./vault write consul/roles/prometheus policies=readonly ttl=30m
You can now get read-only Consul tokens with Vault:
$ ./vault read consul/creds/prometheus
Key                Value
---                -----
lease_id           consul/creds/prometheus/aHH75i4m76V6Uwjr7xaCGlug
lease_duration     30m
lease_renewable    true
accessor           df3ca983-2a9d-ed8f-1366-70ebc632403b
local              false
token              00d5d656-3565-8ee2-a1ca-125cad975bb5
The token (00d5d656-3565-8ee2-a1ca-125cad975bb5) is a valid read-only Consul token. It can be renewed and revoked with Vault.
Vault AppRole setup
Prometheus does not have native Vault capacities. It requires a tool to play with Vault and request/renew the tokens. This tool is the Vault Agent.
We will authenticate the Vault Agent with Vault using the AppRole. There are many alternatives that can be used, e.g. Kubernetes, GCP, AWS, ..
Let’s create a Vault policy file, call consul-read-token.hcl. That policy allows the emission of Consul tokens.
path "consul/creds/prometheus" {
 capabilities = ["read"]
}
Upload the policy on the Vault server:
$ export VAULT_ADDR='http://127.0.0.1:8200'
$ ./vault policy write consul-read consul-read-token.hcl
Let’s create the AppRole credentials for the Vault Agent to use:
$ ./vault auth enable approle
$ ./vault write auth/approle/role/prometheus token_policies=consul-read
$ ./vault read auth/approle/role/prometheus/role-id
Key        Value
---        -----
role_id    9769e748-5531-bcf4-8b36-fe78543aa04a
$ ./vault write -f auth/approle/role/prometheus/secret-id
Key                   Value
---                   -----
secret_id             78d159aa-e420-9f82-6ee5-16163fff1d8f
secret_id_accessor    4f2aebb0-7a27-d5df-ec06-c9cac94e0fe3
secret_id_ttl         0s
Note down the secret_id and the role_id in files:
$ echo 78d159aa-e420-9f82-6ee5-16163fff1d8f > secret_id
$ echo 9769e748-5531-bcf4-8b36-fe78543aa04a > role_id
Vault Agent Configuration
Setup the agent that will take care of fetching and renewing the Consul tokens from Vault.. The agent requires some minimal configuration. Create a file named vault-agent.hcl:
vault {
 address = "http://127.0.0.1:8200"
}

auto_auth {
 method "approle" {
   config = {
       role_id_file_path = "role_id"
       secret_id_file_path = "secret_id"
       remove_secret_id_file_after_reading = false
   }
 }
}

template {
 contents      = <<EOT
{{ with secret "consul/creds/prometheus" -}}
{{ .Data.token }}
{{- end }}
EOT
 destination = "consul_token"
}
The agent can be started with:
$ export VAULT_ADDR='http://127.0.0.1:8200'
$ ./vault agent -config vault-agent.hcl
The Vault agent creates a file called consul_token, with a valid consul token inside:
$ cat consul_token
d2d7d297-b083-87ad-8637-c4da6b54ddb5
Configure and prepare Prometheus
In the prometheus-2.28.0.linux-amd64 directory, let’s prepare a new prometheus.yml file:
scrape_configs:
- job_name: consul-services
 consul_sd_configs:
 - server: localhost:8500
   authorization:
     credentials_file: ../consul_token
Then, launch Prometheus:
$ ./prometheus
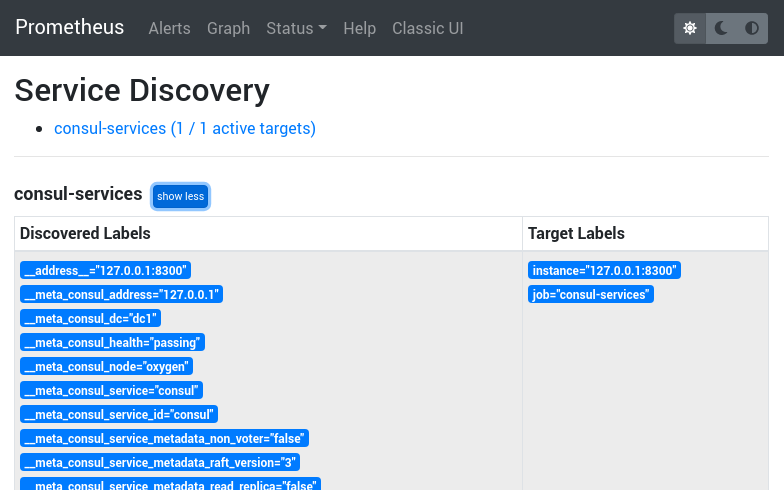
If you go to the Status > Service Discovery page, you should see your Consul targets.
Conclusion
Once you have the setup running, the Vault Agent will fetch a secret and renew it.
Once the Vault Agent is stopped, or can’t renew the secret, the token will expire. When the secret is rotated (e.g. agent restarts), Prometheus will pick up the new secret automatically from the file.
This enables automatic Consul token management.